Showing posts with label diy. Show all posts

painted terra cotta pot + diy

Wednesday, April 02, 2014


I love succulents. I love succulents more than regular plants because if I forget to water them for a few days, you wouldn't even know. I have a plant that I keep on the top of my fridge that's gorgeous, with vines trailing down the front and reaching longingly towards the window. If it doesnt get water, it shows, which reminds me of how bad of a plant-mom I am, which makes me a bad person, and who needs all that negativity anyway. Succulents are much better, happier plants. Needless to say I am still growing chamomile and lavender on my windowsill and have plans for all kind of porch veggies this summer.
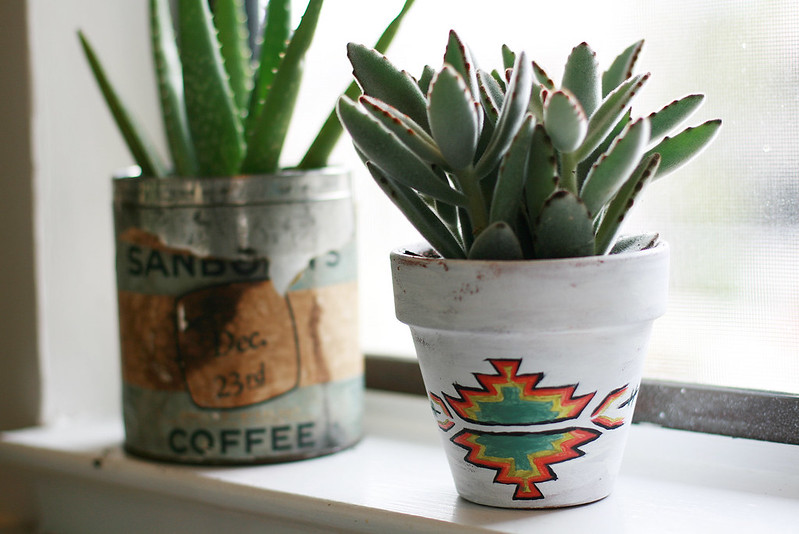
I grabbed one of these pots from work, as well as the panda plant. But I'm not a huge fan of that peachy-orange color so I wanted to give it a mini-makeover. I searched to see if there was anything special I needed to do to prep it... or mod podge it.. or something but, nope. Just plain ol' acrylic paints will do.

All you will need is a couple of different sized paintbrushes, acrylic paint, and your pot. If you would like, you can finish with a coat of clear acrylic spray paint. You can spray the inside of your pot with it also to help protect the pot from moisture.


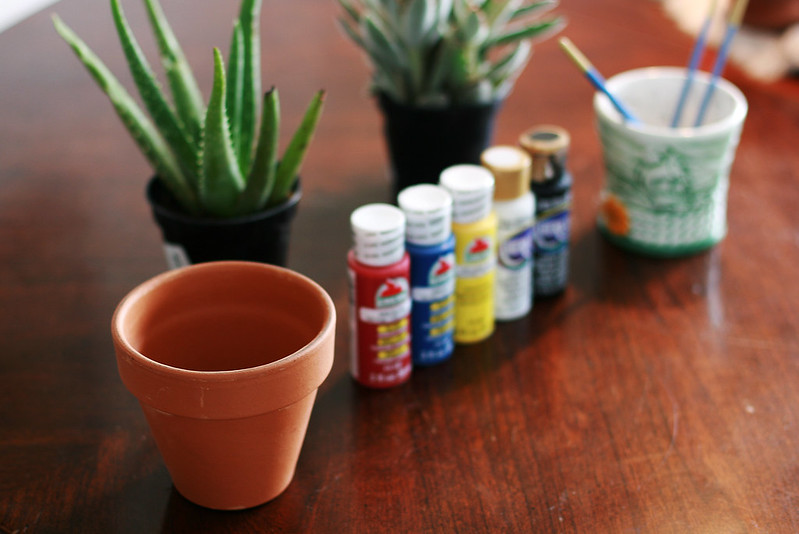
1. I used a dry brush and lightly brushed white paint over my entire pot, leaving some brush strokes light enough to see the terra cotta underneath. The white was just... regular and turned out matte. For the colors I used semi-gloss. If you want, wet your brush and apply paint heavily and in layers, letting each layer dry before adding the new one. You could even paint one layer of another color (ooh.. like kobalt blue) and then dry brush white over the top of it.
2. I chose a southwestern design. As you can see... I'm no artist, and no perfectionist at that. I was uh... keeping with the messy look of it all. The hardest part is keeping your design symmetrical.


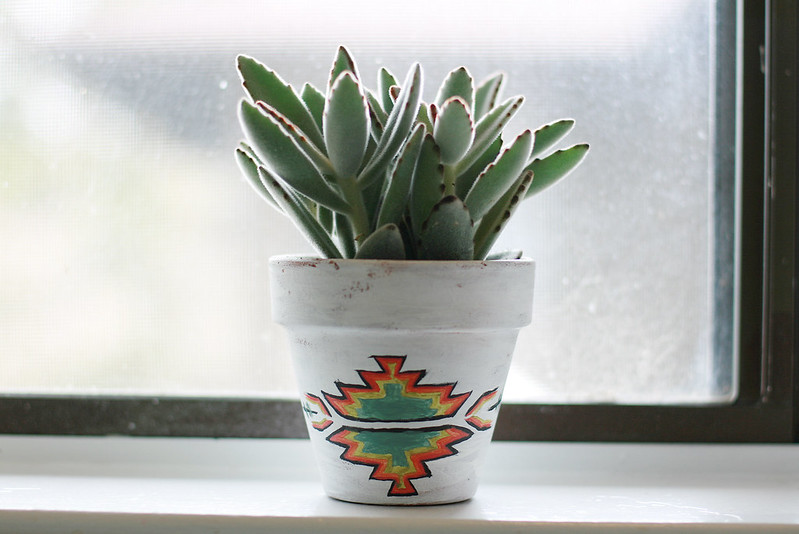
The possibilities really are endless, and the whole painting process took maybe 30 minutes. I can easily seeing it done in 10 if there wasn't a specific design involved. I'm already dreaming of the next pots I could paint.. like metallic gold on gray, or red and white stripes. I just might have to get a large one to put on the porch :)


october first + spooky garland diy

Tuesday, October 01, 2013


I am absolutely elated for fall and I've been reluctantly waiting until payday to buy any decorations. It doesn't seem right. Usually I have candles and pumpkins all over the place. I wanted to paint pumpkins last weekend with rick, but the only stores that have them around me have them priced ridiculously high (??)! At my work the large pumpkins are 7+ dollars, so we decided to wait. That didnt mean I couldn't pull out my craft bin and see what I could come up with! I'm not sure where I can place it because my puppy will tear it down if it's within her reach. I'll most likely put it outside on our deck. It's nothing fancy but satisfied my autumn craft craving, and it's fairly easy, just a little time consuming. Overall it took me less than 2 hours.


spooky felt garland

scissors
marker
paper
fabric glue (or hot glue)
various colors of felt - 4 sheets or so
yarn (or ribbon)


On your piece of paper, draw your designs. I chose a scaredy cat, a jack o lantern, a bat, and I made one scared kitty silhouette. If you're amazing at drawing and can come up with a design off the top of your head, I applaud you. I had to trace from some vintage ephemera & clip art I found online. Once you've drawn your designs, cut them out.
You want to fold your sheet of felt in half, cut it, and fold those pieces in half and cut those so you have 4 squares of felt from each sheet. Fold your drawing in half like in the photo above, and place it on top of your square of felt thats also folded in half, and carefully cut out your design.


Once you have all of your outlines cut out, you will need to cut out the little eyes and jack of lantern smile (and those kitty teeth). You can be as creative as you want here, multiple layers and such, but I chose the simple route to save time. Glue your pieces onto your bases, and then glue your ribbon or yarn to the back of each! It's easy, and pretty cute.


easy breezy pinup curls + tutorial

Friday, September 13, 2013


I do my hair like this A LOT. It takes about 20 minutes and the curls stay in so much longer than when I just run an iron through them! I call this "pinup curls" because I use a 1" curling iron, but if you use a bigger iron and less curls you may just find that you have more of an old hollywood wave when you brush them out. You need a really, really hot iron, so put yours on turbo or something. You're also going to need some of these:


1. You're going to want to part your hair where you normally do. The deeper the part, the more curls you're going to create on the bigger side. Easy enough.
2. Take a square section of your hair closest to the part, mine is about 3 inches. Place it in the curling iron, be careful not to crease it (you ladies know what I'm talking about), and wrap your hair around it once while leaving it close to your head. You're going to be curling from root to end, until the ends are clamped in last and you have a roll of hair around your iron.
3. Now... I find it easiest to carefully open and close my iron as I shake the curl loose, because I want to keep my curl as intact as possible. I usually pull the curl out from the iron and onto my thumb.
4. Pin the curl in place, making sure you get the ends in there. The goal is to pin your curl while it's still hot. Spray with hairspray if you'd like.
5. Do that all around the crown of your head. You HAVE to make sure that your curls are all facing the same way, and your ends are being curled the same way, that way when you brush it out your curls / wave will be uniform. Mine also sit fairly far away from my part, you can put your curls right on top of your part if that's what you like, just make sure theyre all rolling in the same direction.
6. My bangs are fairly short so it only took 2 curls to pin them. You can play with it and decide how you want the facing - front, down the side of your part like mine, etc.
7. Give it a good dousing of hairspray while they cool.
8. Let them cool completely before taking the pins out. I know, it's difficult.
9. Once you pull the pins out you're going to look like shirley temple, hopefully. Take a soft bristle brush and run it through each curl. I spray with hair spray again and run a pea size amount of oil in my hair to calm them down.
10. Ta-da!

Vintage Floral Dress Makeover + diy

Wednesday, September 04, 2013


I absolutely love this dress. Too much to put in my shop. But the collar, not so much. Or those sleeves. I love the small floral print and the waist, though... so I decided that the sleeves have got to go. I debated leaving the collar, but opted for going without it. I may add a little lace collar later but for now, plain is what I had in mind. It just would look better for fall with a knit cardigan and some burgundy tights, dont you think? Not that I'm crossing my fingers for rain or planning when my next pumpkin spice latte will be..

Removing sleeves is a lot simpler than I thought it would be. I am not an expert sewer, I made some lingerie awhile back and I do minor repairs and hemming. Ask me about any technical terms though and I am completely lost. I didn't take any in between photos because, honestly all I did was take a seam ripper to the seams of the sleeves! I didnt cut them because I made that mistake once before, and.... let's just say it wasn't cute and that dress is now always worn with a sweater. Just turn the dress inside out and rip the seams, starting from the armpit. It took me about 15 minutes because I wanted to be careful to not accidentally rip any holes. If you're going to hem your dress like I did, measure about an inch longer than you'd like the hem to be so there's room to fold over your edge. Lastly, I removed the collar with the seam ripper which was a piece of cake. There was still a clean edge when I was done so there was no need to re-sew the neckline (yay!). I left the edges where the sleeves used to be about 1/4" to the new seam and voila, much better :)